
Linux Audio Recording Guide




Browser-Based DAW
Try our browser-based Digital Audio Workstation—zero install. It's running right here. More »Multi-track recording and mixing directly in the browser. Built with the Web Audio API and modern JavaScript, it supports:
- Multi-track recording — record and layer audio tracks with individual volume and pan controls
- Waveform visualization — see your audio as you record and play back
- Master transport controls — play, pause, stop, reverse, and BPM-synced tempo
- Clip trimming — drag to select regions, trim silence, and arrange sections visually
- Keyboard shortcuts — Press F1 to speed up editing with keybindings for record, play, stop, and track management
- Browser-based noise reduction — real-time filtering without external plugins
Audio Recording
Whether you are cutting a podcast, laying down demo tracks, or producing a full album, Linux offers quality audio tools without licensing fees or subscription lock-in. The remainder of this guide walks through the entire workflow: choosing recording software, reducing noise, normalizing levels, trimming clips, editing with keyboard shortcuts, and mixing multiple tracks — all using free, open-source applications.
Professional recording hardware delivers the best results, but modern home PCs — even an old laptop, a Raspberry Pi, or an Arduino — can capture a surprising amount of fidelity with the right software. Built-in sound cards often suffer from noise and nonlinear A/D conversion, but a modest USB audio interface solves that for under $100.
Audacity
Audacity is the flagship open-source multi-track editor. It balances power with approachability: you can record a simple voice memo in seconds, yet its toolset handles professional session work. The built-in documentation covers every feature.
Newer versions of Audacity include AI-driven tools that simplify common tasks:
- AI Noise Reduction — learn a noise profile from silence, then apply spectral subtraction with a single click
- AI Clip Trimming — intelligently detect and remove silence, breaths, and mouth noises without manual selection
- Keyboard Shortcuts — Audacity supports customizable keybindings for nearly every operation. Common defaults include Space for play/pause, R for record, Ctrl+X to trim silence, and Shift+Z for zoom. You can remap any action under Edit > Preferences > Keyboard.
- Effects chain — batch-process noise reduction, normalization, EQ, and compression in one pass
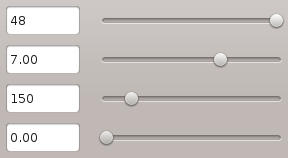
To get a noise profile: select a quiet section of audio, then go to Effects > Noise Reduction > Get Noise Profile. Select the entire track, reopen the effect, and click OK. For best results, adjust the sensitivity sliders per track — a single profile rarely suits every source.
SoX — The Swiss Army Knife of Audio
SoX processes audio from the command line, which makes it ideal for scripting and batch workflows. A basic recording:
rec out.wavSoX also handles noise profiling and reduction in two passes:
sox out.wav -n trim 0 .9 noiseprof | play out.wav noisered - 0.2This approach is fast but can introduce artifacts. An alternative is a noise gate using compand:
play out.wav compand .2,.2 -30.1,-inf,-30,-20 0 -90 .1This attenuates everything below -30 dB and compresses the remaining signal into a 0–20 dB range with 200 ms attack/decay. A more refined multi-band gate:
play out.wav mcompand ".01,.2 -50.1,-inf,-30.1,-50" 100 \

".01,.2 -50.1,-inf,-30.1,-50,-30,-20" 1000 \

".01,.1 -70.1,-inf,-50.1,-70" 3000 \

".01,.1 -70.1,-inf,-40.1,-70"
Refer to the SoX documentation for additional parameters.
Quick Recordings with GStreamer
For quick captures, GStreamer pipelines work from the terminal. Save hard drive space with compressed Ogg Vorbis:
gst-launch -e autoaudiosrc ! audioconvert ! vorbisenc ! oggmux ! filesink location=out.oggOr capture lossless FLAC for archival quality:
gst-launch -e autoaudiosrc ! audioconvert ! audio/x-raw-int,rate=44100,channels=1 ! flacenc ! filesink location=out.flacPlay back with the reversed pipeline:
filesrc location=out.ogg

 ! oggdemux ! vorbisdec ! audioconvert ! autoaudiosink
Any player — ffplay, mplayer, Totem — handles these formats. A codec pack may be needed for Windows Media Player.
Master Control — Visual GStreamer Pipelines
We built Master Control as a graphical interface for gst-launch. It provides drag-and-drop pipeline assembly with real-time feedback on plugins like the level meter, spectrum analyzer, noise reduction, pitch shifting, and EQ filters. You can tweak parameters live without editing command-line flags.
Removing Noise with PulseAudio
PulseAudio supports noise cancellation via the WebRTC audio processing module. Install the webrtc-audio-processing package through your system package manager (Apper or yum on Fedora), then append the following to /etc/pulse/default.pa (or ~/.pulse/default.pa for a per-user configuration):
### Load echo cancellation module

load-module module-echo-cancel source_name=echosource aec_method=webrtc

set-default-source echosource
Restart PulseAudio with pulseaudio -k.
Noise Gate via LADSPA
Master Control can apply a LADSPA noise gate to a live microphone stream. The ladspa-gate plugin is mono-only; for stereo sources, GStreamer's deinterleave and interleave elements split and recombine channels. Find available LADSPA plugins with:
gst-inspect |grep ladspaA live noise gate preview (adjust Threshold to match your room):
autoaudiosrc ! audio/x-raw-float ! ladspa-gate Threshold=-30.0 \

Decay=2.0 Hold=2.0 Attack=0.1 ! queue ! audioconvert ! autoaudiosink
A pitch shifter for fun:
autoaudiosrc ! audio/x-raw-float ! ladspa-tap-pitch \

Rate-Shift----=-20 Wet-Level--dB-=20 ! queue ! audioconvert ! autoaudiosink
Master compressed audio with the noise gate applied:
autoaudiosrc ! audioconvert ! ladspa-gate Threshold=-30.0 \

Decay=2.0 Hold=2.0 Attack=0.1 ! vorbisenc ! oggmux ! filesink \

location=out.ogg
Or master lossless FLAC for maximum quality:
autoaudiosrc ! ladspa-gate Threshold=-30.0 Decay=2.0 \

Hold=2.0 Attack=0.1 ! audioconvert ! \

audio/x-raw-int,rate=44100,channels=1 ! flacenc ! filesink \

location=out.flac
Editing in Audacity
Audacity's editing and filtering tools let you shape each track precisely. Common editing tasks can be automated to speed up repetitive work.
The typical noise-reduction workflow: record or select silence, grab a noise profile via Effects > Noise Removal > Get Noise Profile, then apply to the full track. The default settings are rarely optimal — adjust the sliders and preview until the artifacts are acceptable. We salvaged a particularly noisy microphone with the settings shown below.
Keyboard Shortcuts for Faster Editing
Audacity's keyboard shortcuts turn slow mouse work into fluid editing. Key defaults every producer should know:
- Space — Play / Stop
- R — Start / Stop recording
- Shift + R — Record on the current track
- Ctrl + X — Trim selected audio (delete all but the selection)
- Ctrl + K — Split cut (remove selection, leave gap)
- Ctrl + I — Split at cursor position
- Ctrl + J — Join adjacent clips
- Ctrl + L — Silence the selection (replaces with silence)
- Shift + Z — Zoom to selection
- Ctrl + 1 / 2 — Zoom in / out
- Delete / Backspace — Delete selected audio and close gap
All shortcuts are configurable under Edit > Preferences > Keyboard.
Normalize Sound Levels
Tracks that are too quiet invite noise floor issues; tracks that are too loud clip and distort. Normalization brings the peak level to a target (usually -1 dB or -3 dB) so your production sits consistently with commercial releases. Most editors — Audacity, SoX, our DAW — offer a normalize function. SoX:
sox in.wav out.wav norm -3Transients can skew automatic results. A final level adjustment by ear always beats a blind normalization.
Recording Multiple Tracks
Overdubbing and mixing tracks lets you layer vocals over instruments, create harmonies, or insert narration into a pre-recorded backing track. It is the same technique that enables "singing along with yourself."
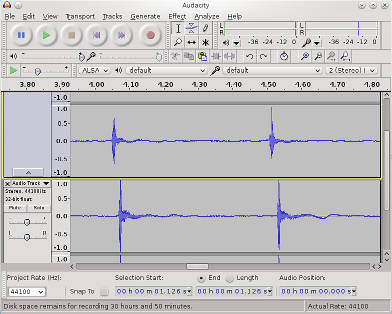
If your overdubs drift out of sync, perform a latency test. We measured 157 ms on one system and compensated by shifting tracks in the timeline.
Once the arrangement sounds right, export a mixdown to a lossless format — WAV or FLAC — for archival and further mastering.
System-Wide EQ with PulseAudio
Install pulseaudio-equalizer-gtk on Fedora via yum or Apper. No launcher icon is created by default; save the following as a .desktop file:
[Desktop Entry]

Comment=

Exec=/usr/bin/pulseaudio-equalizer-gtk

GenericName=Pulseaudio EQ

Icon=view-media-equalizer

Name=Pulseaudio EQ

NoDisplay=false

Path[$e]=

StartupNotify=true

Terminal=0

TerminalOptions=

Type=Application

X-KDE-SubstituteUID=false

X-KDE-Username=
Getting to Know JACK
Anyone who knows Jack about audio probably does not need this section. For everyone else: JACK is a low-latency audio server that routes audio and MIDI between applications. To play a software synth from an external MIDI keyboard:
- Start QJackCtl
- Launch FluidSynth GUI
- Configure FluidSynth to use JACK routing
- Connect a MIDI keyboard (or use a software keyboard)
- Use QJackCtl's connection graph to wire the keyboard output to the synth input
JACK's learning curve is real, but the payoff is sub-10 ms latency for live performance.
Audio Links
Swap left and right audio channels
Comparison of container formats
Keep it going. Support development or hire an expert programmer for your next project. Copyright © 2026 Henry Kroll III, thenerdshow.com This web page is licensed under a Creative Commons Attribution-ShareAlike 3.0 Unported License.