
Better Laptop Cameras


![]()
![]()

This computer vision research project discloses, through some advanced computer commands, how to record smooth, high-definition video from several sources at once using inexpensive hardware and cheap, USB webcams. This was a feasibility study for building a robot with eyes and ears. 3D vision requires triangulating distances from simultaneous video feeds. It's amazing how much effort it takes to program a computer to do what our brains can do without even being aware of it!
Some laptops have a built-in camera that claims to record HD 1080p at 30fps. That should be all that is necessary to start experimenting. Unfortunately, most recording software can not get anywhere near that. They overheat the CPU and the resulting videos come out choppy with dropped frames, poor sync, missing timestamps, and other problems. Logic says that expensive HD video cameras on the market don't have a faster CPU than most laptops, so what gives? Further analysis revealed that recording software spends too much time encoding and decoding (decompressing and recompressing) video and audio streams.
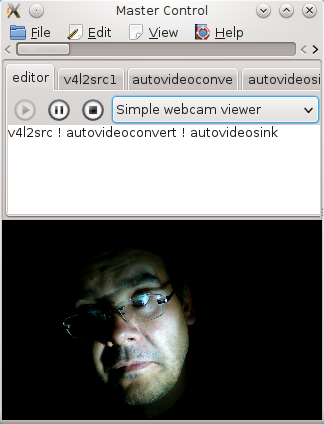
A sister project, Master Control, can use the webcam or laptop camera's built-in compression hardware for encoding, thus ensuring optimum speed, and reasonable quality video recording while freeing the CPU for other tasks (such as analyzing multiple live streams). Recording from multiple sources makes many things possible beyond ranging and object detection, including 3D scene recreation, video overlays, improved security surveillance, super-HD, and panoramic videos. With its configuration-oriented interface, Master Control aims to do it all.
Licensing: For ones own personal use, licensing may not seem very important, but it becomes an issue to consider when planning software for consumption. Because there was no budget for this, using unrestricted, unencumbered, free file formats and software, avoided the usual license and patent restrictions that stifle development and threaten to bring down civilization as we know it.
The preferred development platform is the free Fedora operating system, but most of these free programs are also available for Windows. The Fedora distribution, or "distro" used for this is specially-designed for low-latency multimedia recording and creation. It is available here: spins.fedoraproject.org/jam-kde/
Audio recording
If money is no object professional recording equipment is the way to go. But home PCs are capable of high-quality audio recordings with well-designed software. Built-in sound cards often suffer from noise and nonlinear A/D conversion, but quality audio recording devices may be added on for a reasonable price.
Audacity, the free and open source multi-track recording software, is recommended. It has good online help.
One may also make a quick recording with sox
rec out.wavor with gstreamer.
gst-launch -e pulsesrc ! audioconvert ! vorbisenc ! oggmux ! filesink location=out.oggThe above may be also be done by pasting the exact, same commands into the Master Control editor:
pulsesrc ! audioconvert ! vorbisenc ! oggmux ! filesink location=out.oggVideo recording
The first programs tried were cheese, guvcview, recordmydesktop, ffmpeg, and gstreamer for the purposes of recording high-quality video and audio. It is difficult to get GUI webcam applications like cheese, guvcview, and kamoso to produce good results. Even the Windows applications that came with the webcam produce poor-quality videos with low frame rate. This is because internally they waste precious resources decoding and re-encoding the video. Of the free ones we have tested, guvcview is not as bad as the rest, but it doesn't quite capture everything the webcam is capable of.
Master Control's "Simple webcam viewer" v4l2src tab, guvcview or any other desktop webcam program may adjust picture quality before proceeding.
Alternatively, from the command line, discover the video formats the webcam supports, view settings, and adjust the picture with v4l2-ctl.
v4l2-ctl --list-formats

v4l2-ctl -l

v4l2-ctl -c brightness=185
Ffmpeg records acceptable audio and video together. Unfortunately, there is no preview window. After some googling, it is no problem to construct a pipe to show sort of a bad preview window. Ffmpeg exhibited poor performance recording to the WebM container format, so use another free container format, .mkv instead. Update: It's not ffmpeg's fault. The reason for the poor performance was that other formats require timestamps. Since a webcam does not produce timestamps ffmpeg has to manufacture them out of thin air. The .mkv format is more tolerant of raw, or hardware-compressed, video streams such as those that pour out of a webcam's USB port.
ffmpeg -y -r 30 -f v4l2 -s 640x480 -i /dev/video0 -f pulse -i default \

-b:v 1M -threads:0 4 -vcodec libvpx video.mkv -r 10 -f rawvideo - | \

ffplay -s 640x480 -f rawvideo
 It is desirable to record directly to WebM because of its smaller file sizes, often less than half, for faster uploads. The WebM format, along with .mp4 and .ogg, is made for web pages and there are no license or patent restrictions on WebM and ogg, so feel free to develop applications with them without having to pay--or be sued--by some third party.
Gstreamer exhibited the least latency recording to WebM, and it was possible to pop up a preview window during the recording. Initial results were unsatisfactory, but setting quality=9 and increasing the speed and number of threads improved things. Now it becomes apparent why most webcam software doesn't perform. It can't keep up with the transcoding (decompressing the camera's native compressed MJPEG format, processing, and then recompressing to other movie formats like vp8enc). Transcoding uses too much CPU power, causing dropped frames and audio distortion.
The following gstreamer pipeline may be pasted into Master Control. This sort of imitates the way existing applications handle the webcam.
webmmux name=mux ! filesink location=/tmp/cam.webm v4l2src \

num-buffers=300 ! image/jpeg,width=640,height=480,framerate=30/1 ! \

videorate ! jpegdec ! tee name="preview" ! xvimagesink sync=false \

preview. ! autovideoconvert ! vp8enc speed=5 max-latency=2 \

quality=9.0 threads=5 ! queue ! mux.video_0 pulsesrc ! \

audio/x-raw-int,rate=48000,channels=2 ! audioconvert ! vorbisenc ! \

queue ! mux.audio_0
This test assumes the webcam can hardware-encode motion jpeg (MJPEG) video. If it does not work, try raw video. Use video/x-raw-yuv instead of the image/jpeg caps, and get rid of the jpegdec decoder. To discover the webcam's capabilities, use v4l2-ctl --list-formats-ext.
More info about transcoding with Gstreamer.
Better recordings
Ideally, we would record using raw formats, but bandwidth limitations of the Universal Serial Bus (USB) restricts the HD framerate of raw videos, so a compressed format like MJPEG is a good compromise. Newer cameras support other compressed streams, such as .H264, and if we wanted to save CPU power we could simply pass that already-compressed output straight to disk, without those CPU-intensive decode and re-encode steps. Converting between formats is potentially lossy, so we should use the most direct recording method for mastering.
The primary barrier we encounter inserting the camera's MJPEG stream directly into a container, bypassing decoding and re-encoding, is that most containers can not handle MJPEG, but we learned we can mux just about anything into the versatile Matroska (.mkv) container.
The other problem is we can't show a preview window without decoding the MJPEG stream (and that defeats the purpose of this exercise of not using a decoder). These optimizations allow us to record using the full HD size (1280x1024) and framerate (30 fps) of the webcam, and since we're not taxing the CPU there are no dropped frames and the audio is not distorted. We could even record from several cameras at once now.
gst-launch -e matroskamux name=mux ! filesink location=/tmp/cam.mkv v4l2src \

num-buffers=300 ! image/jpeg,width=1280,height=1024,framerate=30/1 ! \

jpegparse ! mux.video_0 pulsesrc ! \

audio/x-raw-int,rate=48000,channels=2 ! audioconvert ! vorbisenc ! \

queue ! mux.audio_0
A codec pack will be necessary to play the resultant .mkv video on Windows Media Player, but we can play them on Linux using any number of players like ffplay, mplayer, or totem. We now have a video master that we can later edit and convert to whatever other formats we need.
More examples using Gstreamer for broadcast overlays, security cameras, and time-lapse recording may be found here.
Removing noise
We can use ladspa effects plugins with gstreamer to add a noise gate to our microphone during recording. The ladspa-gate is a mono effect, so we can not use it with stereo streams. (Gstreamer is capable of splitting the stereo streams into dual mono with deinterleave and later recombining them with interleave, but we do not want to get into all that here.) We may query gstreamer about other ladspa plugins on the system. Some of them support stereo.
gst-inspect |grep ladspaTest the noise gate threshold first to see how it sounds. We may have to adjust it up or down, depending on the background noise level. Try Threshold=-32.0 or Threshold=-28.0.
gst-launch -e pulsesrc ! audio/x-raw-float ! ladspa-gate Threshold=-30.0 \

Decay=2.0 Hold=2.0 Attack=0.1 ! queue ! audioconvert ! pulsesink
Now we can master HD video with the noise gate applied. While we're at it, let's use tee to add a video preview. This is similar to the code we used for Master Control's HD webcam recorder.
gst-launch -e matroskamux name=mux ! filesink location=/tmp/cam.mkv v4l2src \

num-buffers=300 ! image/jpeg,width=1280,height=1024,framerate=30/1 \

! tee name=pq ! queue ! jpegparse ! mux.video_0 pulsesrc ! ladspa-gate \

Threshold=-20.0 Decay=2.0 Hold=2.0 Attack=0.1 ! audioconvert ! vorbisenc \

! mux.audio_0 pq. ! queue leaky=1 ! jpegdec ! autovideosink
Update: Although the above works, the sound gradually goes out-of-sync with the video. The reason for this is unclear. After browsing several forums and questions on stackoverflow, we decided we are going about this all wrong. This new pipeline is what Master Control currently uses. Here we are taking the raw video from the camera and doing our own jpegenc. This is faster than most encoding formats.
This also addresses the current problem with pulseaudio recordings generating audible clicks and pops by switching to alsasrc and increasing the latency-time to 100000. There may be a setting in pulseaudio configuration for this, but it is not adjustable through gstreamer, so here we go.
matroskamux name=mux

 ! filesink sync=false qos=1 location=/tmp/cam.mkv

v4l2src ! video/x-raw-yuv,format=(fourcc)YV12

 ! tee name=pq ! queue ! jpegenc idct-method=2 ! mux.video_0

alsasrc latency-time=100000

 ! audioconvert ! audio/x-raw-float,channels=2 ! queue

 ! vorbisenc ! mux.audio_0 pq. ! queue leaky=1

 ! xvimagesink sync=false
Video Soundtracks
Sometimes an existing video has an audio track that needs work. It's handy that Master Control can do this. Choose Separate audio from video from the dropdown list. You should see something like the following.
filesrc location=/tmp/cam.mkv

 ! matroskademux

 ! vorbisdec

 ! wavenc

 ! filesink location=/tmp/cam.wav
Change the filesrc location to the video to grab audio from and press the "Record" button.Ffmpeg can also grab audio tracks from a video from the command line.
ffmpeg -i /tmp/cam.mkv out.wavRefer to our audio page for working with vocals and video soundtracks.
Remixing sound and video
Once the audio track is finished, we can merge it back into a video with ffmpeg.
ffmpeg -i finished.wav -i video.mkv out.mkvBlender is capable of mixing and arranging video and audio tracks, as well as overlays, stabilization, green screen, doing just about anything else with video and 3D animation, but using it is beyond the scope of these notes.
A/V links
Swap left and right audio channels
Comparison of container formats
Keep it going. Support development or hire an expert programmer for your next project.
 Copyright © 2026 Henry Kroll III, thenerdshow.com This web page is licensed under a Creative Commons Attribution-ShareAlike 3.0 Unported License.